
Alize Puffy More/Bernat Alize Blanket-EZ Graph It Instruction Sheet
DOUBLE-STRANDED LOOP YARN KNITTING INSTRUCTIONS AND TIPS
Have you heard? There is a new double-stranded loop yarn on the market! Check out my blog post on Bernat Alize Blanket-EZ Graph It yarn. [EDIT: This yarn has unfortunately since been discontinued by Bernat.]
This instruction sheet is intended as a helpful guide for use when knitting Alize Puffy More and Bernat Alize Blanket-EZ Graph It yarn patterns distributed by I Love My Blanket and is not affiliated with the Alize Yarns or Bernat Yarns brands.
Alize Puffy More and Bernat Alize Blanket-EZ Graph It are double-stranded yarns which are manufactured in a way to create double-sided colourwork patterns. Currently, these are unique products and no other yarn brands would be suitable for substitution with these designs.
The loops of these yarns are quite small (smaller than single-strand loop yarns), and although it’s possible to finger knit them, you may find that you prefer to knit these yarns with a crochet hook, depending on the size of your fingers and your dexterity.
I Love My Blanket patterns for Alize Puffy More and Bernat Alize Blanket-EZ Graph It yarns are distributed with visual template and row-by-row colour block instructions (for blankets only). This guide will serve as the only technique instructions for your pattern. Be sure to read the full guide before proceeding, so that you know how to start, knit and finish with this product, and then continue to the template to know which colour stitches to use for the front side of your design.
This English-language video from Yarnspirations for Bernat Alize Blanket-EZ Graph-It yarn provides video tutorial instructions that will work for Alize Puffy More as well!
KNITTING INSTRUCTIONS
Starting row:
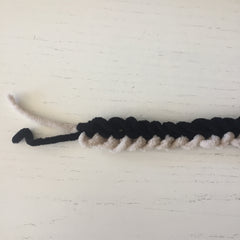
To begin your project, you will need to create a starting row. The length of this row will change from pattern to pattern. Pull a loose strand of yarn from your skein. It should look like the image below, with strands of loops in two different colours, attached at the base.

Cut open the first set of loops where the base of each loop meet (the centre of the ‘8’ shape. You will tie and weave in these ends when your project is complete.
Pick one colour and count out the number of loops for your starting row. Place a stitch marker in the final double stitch, through both colours.
To create your starting row, you will be ‘binding off’ a row of each colour of stitches. If you’ve done loop yarn knitting or standard knitting before, you’ll be familiar with binding-off as a technique that is used to finish a row of stitches at the top edge of your project. In this case, we are binding-off stitches to make a clean edge for the bottom of our project, from which we will then knit our first row.
Place the cut end of your yarn strand to your left. You are going to work one colour at a time. With the loops of colour 1 only, and working left to right, feed the 2nd loop through the 1st loop. Now feed the 3rd loop through the 2nd loop. Continue to your right for the entire starting row, finishing by pulling the loop to the right of the loop with the stitch marker in it, through the stitch marker loop. You should now have a chain of linked stitches. Count the number of your chain links to make sure they are the right amount for your starting row and adjust if necessary). Now go back to the beginning and repeat the same instructions for colour 2.
You should now have two chains, one in each colour, joined together, with the cut yarn end to your left and two loops sticking out of your chain at the right end. Those two loops will be the 1st stitches in our 1st row.
Knitting your 1st row:
This next step is a bit fussy. You are going to knit your 1st row for both the FRONT and BACK of your design by pulling loops of the same colour through the edge of your chain links, from right to left along your row. The 1st chain link on the right end of your chain already has loops pulled through it from when you made your starting row. The next working loops should be knit through the loops to the left of these loops. Continue to your left until all your chain links have loops of the same colour pulled through them in knit stitches.

Your double-stranded chain should now look a bit like a caterpillar! Decide which of your colours will be the light colour in your pattern (white on the template) and which will be the dark colour (black on the template).
To continue to row 2 of your project, look at your template. If the first row of your template is white, place your caterpillar with the light-coloured loops on top. If the first row of your template is black, place your caterpillar with the dark-coloured loops on top. Make sure your ball of working yarn is to your left, because row 2 will be knitted from left to right.
Knitting the FRONT of your design:
To knit your design, you will follow the template, knitting loops of working yarn while moving left to right on EVEN rows and right to left on ODD rows. If the template shows a white square, you will knit a loop of your lighter yarn, and if the template shows a black square, you will knit a loop of your darker yarn.
IMPORTANT: Make sure as you knit the FRONT of your design that you are choosing the correct colour for your stitch from each pair of loops and then moving on to the next pair of loops and picking the next stitch. Your goal is to be left over with the opposite-coloured stitches on the reverse (BACK) side of your project, which will yield a design of the inverse colours of the FRONT.
Knitting the BACK of your design:
Once you have finished the FRONT of your design, turn over your project. The BACK will look like a mess of loops. To knit this side, I would recommend that you work vertically instead of horizontally. You may find it useful, especially with your first project, to knit some of the BACK as you go, especially since this will help you catch any mistakes you might have made before you’ve gone too far to go back and fix them!
My preference is to do a ball/skein at a time, knitting the FRONT and then knitting the BACK. Make sure if you do go back and forth that you always return to the FRONT to continue with your pattern - the template provided is only for the FRONT of your design - the back will be the inverse colours.
Select one side edge of the BACK of your project, and starting from the bottom-most loop (row 1, the loose loops at the bottom of your project), pull the loop directly above it through your loop in a knit stitch. Continue upward in a straight line, knitting each stitch in the column. Once you finish the loops in column 1, continue to column 2 and repeat for each column until the entire BACK side is knitted.
Binding your top edge:
Along the top edge of your project you should now have two rows of unfinished loops. In a similar technique to your STARTING ROW, bind off the top edge in two chains, by linking the loops of the same colours together, so that you have a light-coloured chain and a dark-coloured chain.
Count one extra set of loops and cut your yarn. Cut open the extra set of loops.
Changing skeins:
To change skeins of yarn, cut open a set of loops at the end of your current strand of yarn as well as the first set of loops on your new skein. Tie the ends of each skein together in a knot.
Tying and weaving in your ends:
Tie the strands of cut yarn together in a knot and then weave the loose ends into your project in the space between your FRONT and BACK design layer.
The easiest way to hide your loose strands of yarn between skeins is to knit over them when you knit your BACK layer. Just lay your strands flat between the rows and knit your vertical columns of stitches over them.
SAMPLE OF TEMPLATE INSTRUCTIONS
Your pattern will include a full-design template, a more detailed ‘REPEAT’ template (or multiple motif repeats), as well as the relevant row numbers, etc. The details below are a sample. Refer to your pattern for the actual details of your project.
|
|
|
|
|
|
|
|
|
|
|
|
|
|
|
|
|
|
|
|
|
** NEW ** (October 28, 2022): All Alize Puffy More blanket patterns now also include colour-coded row-by-row stitch instructions. To learn more, read our blog post.