

SPOTLIGHT ON: Increasing and Decreasing Stitches
As part of a continuing series, I'll be highlighting different special stitches and motifs. Be sure to read my previous spotlights on Cable Stitches and the Horizontal Chain Stitch.
There are many ways to use increased or decreased stitching in your knitting projects, including to modify your project's dimensions and to create unique motifs.
Increasing and decreasing stitches are techniques most frequently used when knitting garments, in order to increase or decrease the width or circumference of your project. Adding stitches increases the knitted surface; and removing stitches reduces it.
Reducing stitches
For example, in my Fish Tail Mermaid Hat pattern, The body of the hat tapers at the top where the tail is attached. In order to achieve this effect, stitches are reduced in the final few rows.

In examples like this, where the specific texture does not matter and the goal is reducing width, the technique is simple: Feed your loop of working yarn through two (or more) loops of stationary yarn (usually in the direction of the row you are knitting).
Here is a short video clip showing the technique:
Increasing stitches
Increasing stitches is often necessary when knitting blankets in the round, where the circumference of your project increases every row. If you do not add enough stitches, your edges will start to curl; whereas if you add too many, your edges will start to ripple.
To increase your project by one stitch, you will perform a knit or purl stitch, but instead of pulling one loop of working yarn through your stationary yarn, you will pull two. For each extra stitch you pull through, it will increase the width of your project by one stitch.
Here is a short video clip showing the technique:
Examples of patterns that use increased stitches to increase their circumference: Rainbow Throw Blanket, Infinity Square Blanket, Circular Crochet-Look Throw Blanket, Oval Rag Rug
Creating Ripples or Chevrons
Combining increased and decreased stitches in the same row of your blanket can create a wavy row pattern. GoodNightKisses demonstrates this technique in their video tutorial of the Zig Zag Blanket Pattern from Michael's:
The key to this technique, in order to create rows with an equal number of stitches and symmetrical waves, is to remember that there should always be the same number of increased and decreased stitches in each row.
Examples of patterns that use this ripple/chevron technique: Ripple Blanket
Creating Simple Leaf Motifs
When you decrease a stitch, stacking your two stationary stitches creates a texture. If you pull your working yarn through your right-hand stationary stitch, the left stitch sits on top, and crosses slightly to the right (I call this double-knit left over right)*. If you pull your working yarn through your left-hand stationary stitch, the right stitch sits on top, and crosses slightly to the left (I call this double-knit right over left)*. You can take advantage of the stitch order to create specific textures and motifs in your pattern design.
* In my patterns, if the placement and order of your decreased stitches affects the look of the design, I describe the order by changing the name.
Below is a swatch from my Wall of Climbing Vines Blanket Pattern. You can see the centre vine design has leaf motifs on either side. You will notice the pointy, tapered top to each leaf - a shape/texture that it is not possible to achieve with regular knit and purl stitches.
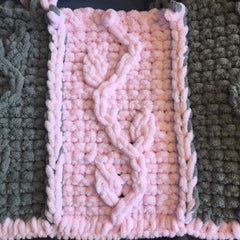
Each leaf motif is three stitches high and two stitches wide. To create a simple leaf motif, such as the ones on the left side of the vine, you will follow these instructions (from the bottom, working your way up).
- row 1 (right-to-left): cross your right stitch over your left stitch
- row 2 (left-to-right): knit 2 stitches
- row 3 (right-to-left): skip your working stitch, then double-knit right over left (decreasing by one stitch)
This leaf on the right side of the vine uses a similar technique, but in a mirror image, so your bottom row would be:
- row 1 (right-to-left): cross your left stitch over your right stitch
- row 2 (left-to-right): knit 2 stitches
- row 3 (right-to-left): double-knit right over left (decreasing by one stitch), then skip your working stitch
Skipping a working stitch for each stitch that you decrease is important, because it will maintain a consistent width for your blanket from row to row. The skipped stitch creates a small hole or 'lace' in your blanket, but it's a very subtle look.
Examples of patterns that use this leaf motif: Wall of Climbing Vines Blanket, Diagonal Vines Blanket, Flowered Vines Blanket, Spiralling Vines Throw Blanket, Wheat Ear Cable Blanket.
This 'pointy' shape can be used in other motifs too! I also used it for the tops of my rabbit ears in my Bunny Tails Blanket, and the tips of my Butterfly wings in my Butterfly Baby Blanket.
Creating Lace Motifs
While the 'holes' of the skipped stitches in the above leaf motifs are very subtle, you can choose to highlight this feature by using them repeatedly in combination with decreased stitches. This technique lends itself towards making geometric shapes, for instance.
You can combine left-leaning diagonal lines (made by combining a skipped working stitch on the left and a 'double-knit left over right' decreased stitch on the right), with right-leaning diagonal lines (made by combining a skipped working stitch on the right and a 'double-knit right over left' decreased stitch on the left) in your designs to make various shapes, including triangles.

Some examples of patterns using this technique are: Southwest Lace Blanket, Shadow Triangles Blanket.
Creating Larger Lace Leaf Motifs
My lace leaf motifs combine the pointy tip of a simple leaf motif as well as the crisp edge lines of the geometric motifs above.

This is a tricky motif! It combines skipped stitches (which gives you the lovely veining along the centre line of the leaf), single decreased knit stitches, single decreased purl stitches, as well as double decreased knit stitches. The technique for each of these increased stitches is basically the same, with the only difference being the order and placement of the loops. Here's a quick run-down of these variations:
Decrease purl stitches
- Double-purl right over left: Place your right stationary loop over your left stationary loop, then push your working loop through both stationary loops, from front to back in a purl stitch.
- Double-purl left over right: Place your left stationary loop over your right stationary loop, then push your working loop through both stationary loops, from front to back in a purl stitch.
Here's a short video clip showing these techniques:
Double-decrease knit stitches
- Triple-knit right stitch: Double-knit left over right, then take your next loop to your right and double-knit right over left (over the double-knit stitch you just made).
- Triple-knit left stitch: Double-knit right over left, then take your next loop to your left and double-knit left over right (over the double-knit stitch you just made).
Here's a short video clip showing these techniques. Note that the triple-knit right stitch is used when moving left-to-right and the triple-knit left stitch is used when moving right-to-left):
Some examples of patterns including lace leaves are: Northern Forest Blanket, Lace Leaf Baby Blanket, Lace Branches Blanket
Further examples of patterns that use decreasing stitches to create different effects are: Acorn Stitch Throw Blanket, Caterpillar Cable Blanket
Creating Bubbles
Bubbles and bobbles are a fun high-texture addition to blankets and garments. To make these, you will increase stitches in one row and then decrease them again in either the next or one of the following rows. Again, it is important that your net increase and decrease is zero, to ensure that both your bubbles and blanket will be balanced.
My Squishy Bubbles Baby Blanket uses this method of increasing and decreasing stitches to create large bubble texture.

This is easier than it sounds! To create the bubbles in this image, for example, you would follow these instructions (from the bottom, working your way up). The base width of your bubble is one stitch.
- row 1 (right-to-left): knit 1 stitch
- row 2 (left-to-right): increase 4 stitches (pull 5 loops through your working yarn)*
- row 3 (right-to-left): knit 5 stitches
- row 4 left-to-right): decrease 5 stitches
* In my pattern, I call this 'Increase 5 loops' to emphasize that you are pulling five loops of working yarn through your stationary yarn, although really you are only increasing by 4 loops plus 1 regular loop for a total of 5.
And that's it! Obviously this is a yarn-heavy technique (11 loops take the space of 3), so the more bubbles you add to your design, the more yarn you will need to account for each embellishment. When creating your own bubble designs, you can try playing around with the size of your bubbles by adding greater or fewer loops.
Another example of this bubble technique is my Fortune Cookie Blanket.
I hope these tutorials help, and inspire your creativity to combine increased and decreased stitches to make your own unique motifs!